The longevity of your transmissions depends largely on the installation and proper maintenance of your belts. By following these best practices, you can significantly reduce downtime and production stoppages in your facilities.
Here are the main best practices for installing belts:
1. Securing your work environment

- Always switch off the machines and padlock them. Perform a start test.
- Place the transmission elements in a safe position.
- Dress appropriately for the task (PPE).
- Remove the safety guard and make sure to replace it appropriately after the work.
- Declutter your work environment and delimit the work area.
- Following the work, carry out quality control by measuring the vibrations.
2. Install new belts
Clean and visually inspect the condition of the pulley grooves. Wear can be measured with the help of a pulley gauge (intervention during downtime).

a) Polished surface
b) Corrosion
c) Sharp edge
d) Impact mark
e) Accumulation of material
Measure shaft deflection and pulley runout with the help of the dial gauge, tolerances should be within standard.
Check applicable tension and deflection per manufacturer’s specifications. Always refer to the chart provided by the manufacturer according to the type of belt, either trapezoidal or notched (intervention during downtime).

3. Aligning the pulleys
Make sure that the pulleys are correctly aligned with the help of a laser device (intervention during downtime).
In order to achieve proper alignment, it may be necessary to adjust the position of the pulleys on the driveshaft. It is imperative to tighten the bolts with the recommended torque using a torque wrench.
| TYPE QD | BOLT | TORQUE (LBS-FEET) |
|---|---|---|
| JA SH-SDS-SD SK | 10-24 1/4-20 5/16-18 | 5 9 15 |
| SF E F | 3/8-16 1/2-13 9/16-12 | 30 60 75 |
| J M N | 5/8-11 3/4-10 7/8-9 | 135 225 300 |
| P W S | 1-8 1 1/8-7 1 1/4-7 | 450 600 750 |
| TAPER LOCK TYPE | QUANTITY | DIMENSION | TORQUE (LBS-FEET) |
|---|---|---|---|
| 1008 1108 1210 1215 | 2 2 2 2 | 1/4 x 1/2 1/4 x 1/2 3/8 x 5/8 3/8 x 5/8 | 55 55 175 175 |
| 1310 1610 1615 2012 | 2 2 2 2 | 3/8 x 5/8 3/8 x 5/8 3/8 x 5/8 7/16 x 7/8 | 175 175 175 280 |
| 2517 2525 3020 3030 | 2 2 2 2 | 1/2 x 1 1/2 x 1 5/8 x 1 1/4 5/8 x 1 1/4 | 430 430 800 800 |
| 3535 4040 4545 5050 | 3 3 3 3 | 1/2 x 1 1/2 5/8 x 1 3/4 3/4 x 2 7/8 x 2 1/4 | 1000 1700 2450 3100 |
| 6050 7060 | 3 4 | 1 1/4 x 3 1/2 1 1/4 x 3 1/2 | 7820 7820 |
4. Adjustment of the key
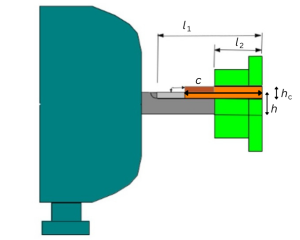
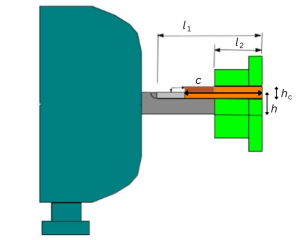
To adjust the key, measure and check the correct key length, using the applicable formulas (intervention during downtime).

Adjusting a square key


Adjusting a rectangular key

Check the tension applied 24 hours after installing a new belt (intervention during downtime).
Note :
This information is given for reference only. It is based on the experience and know-how of Spartakus Technologies and assumes prior consultation of the manufacturer’s specifications.

Erwan Lecuyer,
Marketing Specialist – Spartakus Technologies
erwan.lecuyer@spartakustech.com


